Raspberry Pi manufactures two different USB-C power supplies.
The first is the Raspberry Pi 15W USB-C Power Supply, which is the recommended supply for Raspberry Pi 4 and Raspberry Pi 400. The second is the Raspberry Pi 27W USB-C Power Supply, which provides up to 5A current at +5.1V, and is the recommended supply for Raspberry Pi 5.
The USB-C standard, used by the Raspberry Pi 4 supply, is limited to 5V at 3A, for a total power output of 15W. The USB-PD standard allows higher voltages and currents to be negotiated via software but requires an appropriate Power Management Integrated Circuit (PMIC) which is only present on Raspberry Pi 5. These supplies require that you use suitable USB-PD compatible cables.
NOTE It’s not possible to use older USB “dumb” cables and connectors to provide more than 15W, even with a USB-PD capable supply.
While USB-PD capable phone chargers advertise greater than 15W of power, virtually all of them achieve this by increasing the voltage instead of providing more current at +5V. If you are using a power supply that cannot provide 5A at +5V on first boot you will be warned by the operating system that the current draw to peripherals will be restricted to 600mA.
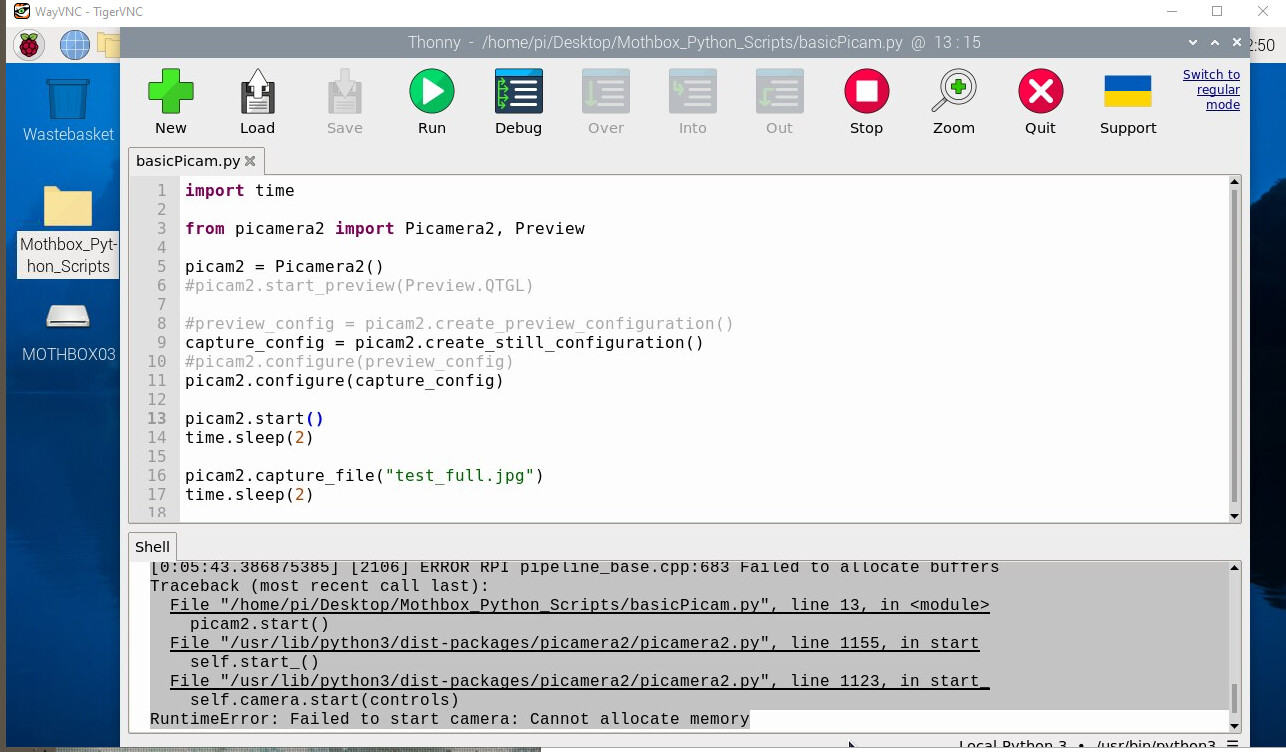
@henri were you able to use them on bookworm with picamera2 in python at all?
because for some reason picamera2 no longer works for my arducams on the pi4 in bullseye. I get memory errors (where i used to not)
i also tested with GitHub - henrihallik/libcamera-cpp-demo-dual-cam: libcamera c++ demo
comment out line 52 in Libcamera.cpp to get it to compile (this test was without the denoise parameter though). they renamed transform variable to Orientation i havent made the fix yet so temporary workaround is just to comment it out.
cool! I’m wondering more specifically though if you can make any picamera2 with python examples work. I can do libcamera things, but unfortunatley not any picamera2
for instance from this example used to work for me in march, and now no longer does
#!/usr/bin/python3
# To run this example, update libcamera-dev to version 0.0.12.

import time
from picamera2 import Picamera2, Preview

picam2 = Picamera2()
picam2.start_preview(Preview.QTGL)
preview_config = picam2.create_preview_configuration()
picam2.configure(preview_config)

picam2.start()
time.sleep(1)

# AfMode: Set the AF mode (manual, auto, continuous)
# LensPosition: Manual focus, Set the lens position.

picam2.set_controls({"AfMode": 0, "LensPosition": 10}) #focus nearby - like 10 cm
time.sleep(5)
picam2.set_controls({"AfMode": 0, "LensPosition": 6}) #focus a meter or so away from lens
time.sleep(5)
my quess is that it doesent work anymore because libcamera has been updated. in march the latest version was 0.0.4 now its 0.1.0. Things have changed. like for example my c++ code didnt work anymore because the Transform transform variable in cameraconfiguration class didnt exist anymore. they had replaced it with Orientation orientation variable and they added functionolity to it before it was only possible to have rotation 0 and 180 degrees, now u can have 0,-90,90,180 and mirrored versions of all these 4 rotations.
I dont use pycamera, i dont use libcamera from python at all. Since u didnt post the error that crashes your app i cant help u much more. only reccommendation i can give u is to use chatgpt to convert my c++ code to python and try to run that python app.
it says at the top of your picamera python code:
# To run this example, update libcamera-dev to version 0.0.12.
so check which libcamera version you have installed
pi@pi5:~ $ dpkg -l | grep libcamera
ii  libcamera-apps                                   1.4.1-1                              all          transitional package
ii  libcamera-dev:arm64                              0.1.0+rpt20231205-1                  arm64        complex camera support library (development files)
ii  libcamera-ipa:arm64                              0.1.0+rpt20231205-1                  arm64        complex camera support library (IPA modules)
ii  libcamera-tools                                  0.1.0+rpt20231122-1                  arm64        complex camera support library (tools)
ii  libcamera0.1:arm64                               0.1.0+rpt20231205-1                  arm64        complex camera support library
ii  pipewire-libcamera:arm64                         0.3.65-3+rpt3                        arm64        PipeWire libcamera plugin
ii  python3-libcamera                                0.1.0+rpt20231122-1                  arm64        complex camera support library (Python bindings)
or check some specific folder if u compiled and installed libcamera from source.
for example libcamera i use is in this folder
pi@pi5:/usr/lib/aarch64-linux-gnu $ ls -la | grep libcamera
drwxr-xr-x   2 root root      4096 Dec  7 19:59 libcamera
lrwxrwxrwx   1 root root        21 Dec  5 12:00 libcamera-base.so -> libcamera-base.so.0.1
lrwxrwxrwx   1 root root        23 Dec  5 12:00 libcamera-base.so.0.1 -> libcamera-base.so.0.1.0
-rw-r--r--   1 root root    198832 Dec  5 12:00 libcamera-base.so.0.1.0
lrwxrwxrwx   1 root root        16 Dec  5 12:00 libcamera.so -> libcamera.so.0.1
lrwxrwxrwx   1 root root        18 Dec  5 12:00 libcamera.so.0.1 -> libcamera.so.0.1.0
-rw-r--r--   1 root root   1841464 Dec  5 12:00 libcamera.so.0.1.0
lrwxrwxrwx   1 root root        13 Nov 27 09:49 libcamera_app.so -> rpicam_app.so
I just installed a version of bookworm and also got it working with the arducam 64 based on your instructions above.
The libcamera commands work, which is great!
but yeah unfortunatley the picamera commands do not (which is unfortunate, because i need more control over the camera startup and photo taking than libcamera offers)
its probably because the example is using too many buffers.
find the method
cam.configureStill(width, height, formats::BGR888, 1, 0);
the third parameter, 1 in my case is number of buffers, yours is probably 4, set it to 1
no actually in your case its the variable buffer_count=4 on row 699 in method create_preview_configuration
Some folks over on picamera2 helped me not get errors and it indeed was about changing the type of buffer to YUV
so i can do this
capture_config = picam2.create_still_configuration(main={“size”: (9152, 6944), “format”: “YUV420”}, buffer_count=1)
and it works but i have to convert that YUV file to something
though it led to an inconsistency between @Edward 's example of the full res data speed
in their example they have that you can capture full res images to memory once every 2 seconds or so
but when i tried this, it would take8-9 seconds
it turned out i could just add a really long timer (25 seconds) after start, and then i could take the photo in just 3 seconds!
I know the image isn’t actually exposing for 3 seconds, so it would be nice to find a way to turn on my lights just for the time the pixels are actually being exposed to save electricity in the field
if u look edwards c++ example its constantly polling frameData from the sensor. u only need to turn on lights when capture starts and turn them off once frameData has been read to memory. Also if u still want to capture RGB i think its possible to capture 2 images at smaller res and pass crop rectangle to libcamera and then combine the left and right image into one afterwards.
anyways whats the lightson() function in python? u have a camera that has flash integrated into it or using additional lightsource?
yeah i implemented edward’s example, but with the capture_array but it still took 3-4 seconds
the reason for the 25 second wait is because after the camera starts it needs to sit and set up all its stuff, or else when you go to capture_array for the first image it will take like 10 seconds
the power supply was not the issue. tested with official RPI power supply and undervoltage errors disappeared. the lines appeared due to fluorescent tube light in the ceiling. kinda similar how when shutter speed is in sync with helicopter blade the appear not moving but if they are off the blade seem moving in weird way on video. turning off the light fixed the problem.
I tried this in a RP5 4GB and is not working in the following version of OS
Linux raspberrypi 6.1.0-rpi7-rpi-2712 #1 SMP PREEMPT Debian 1:6.1.63-1+rpt1 (2023-11-24) aarch64 (the default from bookworm lite available online)
Linux raspberrypi 6.1.0-rpi8-rpi-2712 #1 SMP PREEMPT Debian 1:6.1.73-1+rpt1 (2024-01-25) aarch64 (the version available today 2024-01-31)
That tell me that something that change during this time is breaking the camera, additionally to the fact that /boot/config.txt was moved to /boot/firmware/config.txt