-
Where did you get the camera module(s)?
《德源科技》Jetson Nano 配件:Arducam 2MP OV2311 Camera 攝像頭 全局快門單可見光-Yahoo奇摩拍賣 -
Model number of the product(s)?
B0220 -
What hardware/platform were you working on?
Jetson Nano 2GB -
Instructions you have followed. (link/manual/etc.)
1. Camera Driver Installation - Arducam -
Problems you were having?
Can’t use i2c-tool to access chip id
ex: i2cset -y -f 6 0x0c 0x30 0x0a <= set address
i2cget -y -f 6 0x0c <=get value, it return 0xFF
i2cget -y -f 6 0x0c <=get value, it return 0xFF
but is should be 0x23 & 0x11 -
The dmesg log from your hardware?
-
Troubleshooting attempts you’ve made?
-
What help do you need?
I use the /home/sam/TEST/MIPI_Camera/Jetson/Jetvariety/example/rw_sensor.c, it can read the chip id(0x2311) correctly, but when i use i2cset & i2cget commad, the value of the read register is always 0xFF

Hi @wong
I got the same problem but in RPI.
Can you help me to read the sensor ID value from OV2311 through the I2C tool in RPi4?
Thanks,
Kems T
Hi @Dion,
Thanks for your reply but I am still facing the same issue.
i@raspberrypi:~ $ i2cset -y 10 0x0c 0x23 0x00
pi@raspberrypi:~ $ i2cget -y 10 0x0c
0xff
pi@raspberrypi:~ $ i2cget -y 10 0x0c
0xff
pi@raspberrypi:~ $ i2cget -y 10 0x0c
0x00
pi@raspberrypi:~ $
pi@raspberrypi:~ $ i2cget -y 10 0x0c
0xff
pi@raspberrypi:~ $ i2cget -y 10 0x0c
0xfe
pi@raspberrypi:~ $ i2cget -y 10 0x0c
0xff
pi@raspberrypi:~ $ i2cget -y 10 0x0c
0xff
pi@raspberrypi:~ $ i2cget -y 10 0x0c
0x00
pi@raspberrypi:~ $ i2cget -y 10 0x0c
0xff
pi@raspberrypi:~ $ i2cget -y 10 0x0c
0xfe
pi@raspberrypi:~ $ i2cget -y 10 0x0c
0xff
pi@raspberrypi:~ $ i2cget -y 10 0x0c
0xff
pi@raspberrypi:~ $ i2cget -y 10 0x0c
0x00
pi@raspberrypi:~ $ i2ctra^C
(failed reverse-i-search)`t2ctrans': gst-launch-1.0 v4l2src device="/dev/video0" ! video/x-raw,framerate=30/1 ! videoscale method=0 ! video/x-raw,width=1280,height=1080  ! videoconvert ! x264enc ! avimux ! filesink location=outpu^C.avi
pi@raspberrypi:~ $ ^C
pi@raspberrypi:~ $ ^C
pi@raspberrypi:~ $ ^C
pi@raspberrypi:~ $ i2ctransfer -y 10 w1@0x0c 0x23 r100
0xff 0xff 0xff 0xfe 0x00 0xff 0xff 0xff 0xfe 0x00 0xff 0xff 0xff 0xfe 0x00 0xff 0xff 0xff 0xfe 0x00 0xff 0xff 0xff 0xfe 0x00 0xff 0xff 0xff 0xfe 0x00 0xff 0xff 0xff 0xfe 0x00 0xff 0xff 0xff 0xfe 0x00 0xff 0xff 0xff 0xfe 0x00 0xff 0xff 0xff 0xfe 0x00 0xff 0xff 0xff 0xfe 0x00 0xff 0xff 0xff 0xfe 0x00 0xff 0xff 0xff 0xfe 0x00 0xff 0xff 0xff 0xfe 0x00 0xff 0xff 0xff 0xfe 0x00 0xff 0xff 0xff 0xfe 0x00 0xff 0xff 0xff 0xfe 0x00 0xff 0xff 0xff 0xfe 0x00 0xff 0xff 0xff 0xfe 0x00 0xff 0xff 0xff 0xfe 0x00
pi@raspberrypi:~ $
Please check the above output I really stuck on this.
Hi,
Sorry for the late reply ![]()
Please try the command below:
i2ctransfer -y 10 w2@0x60 0x30 0x0a r2
Hi @Dion ,
Thanks for your reply.
Please see the below image. I tried it but got the same result.
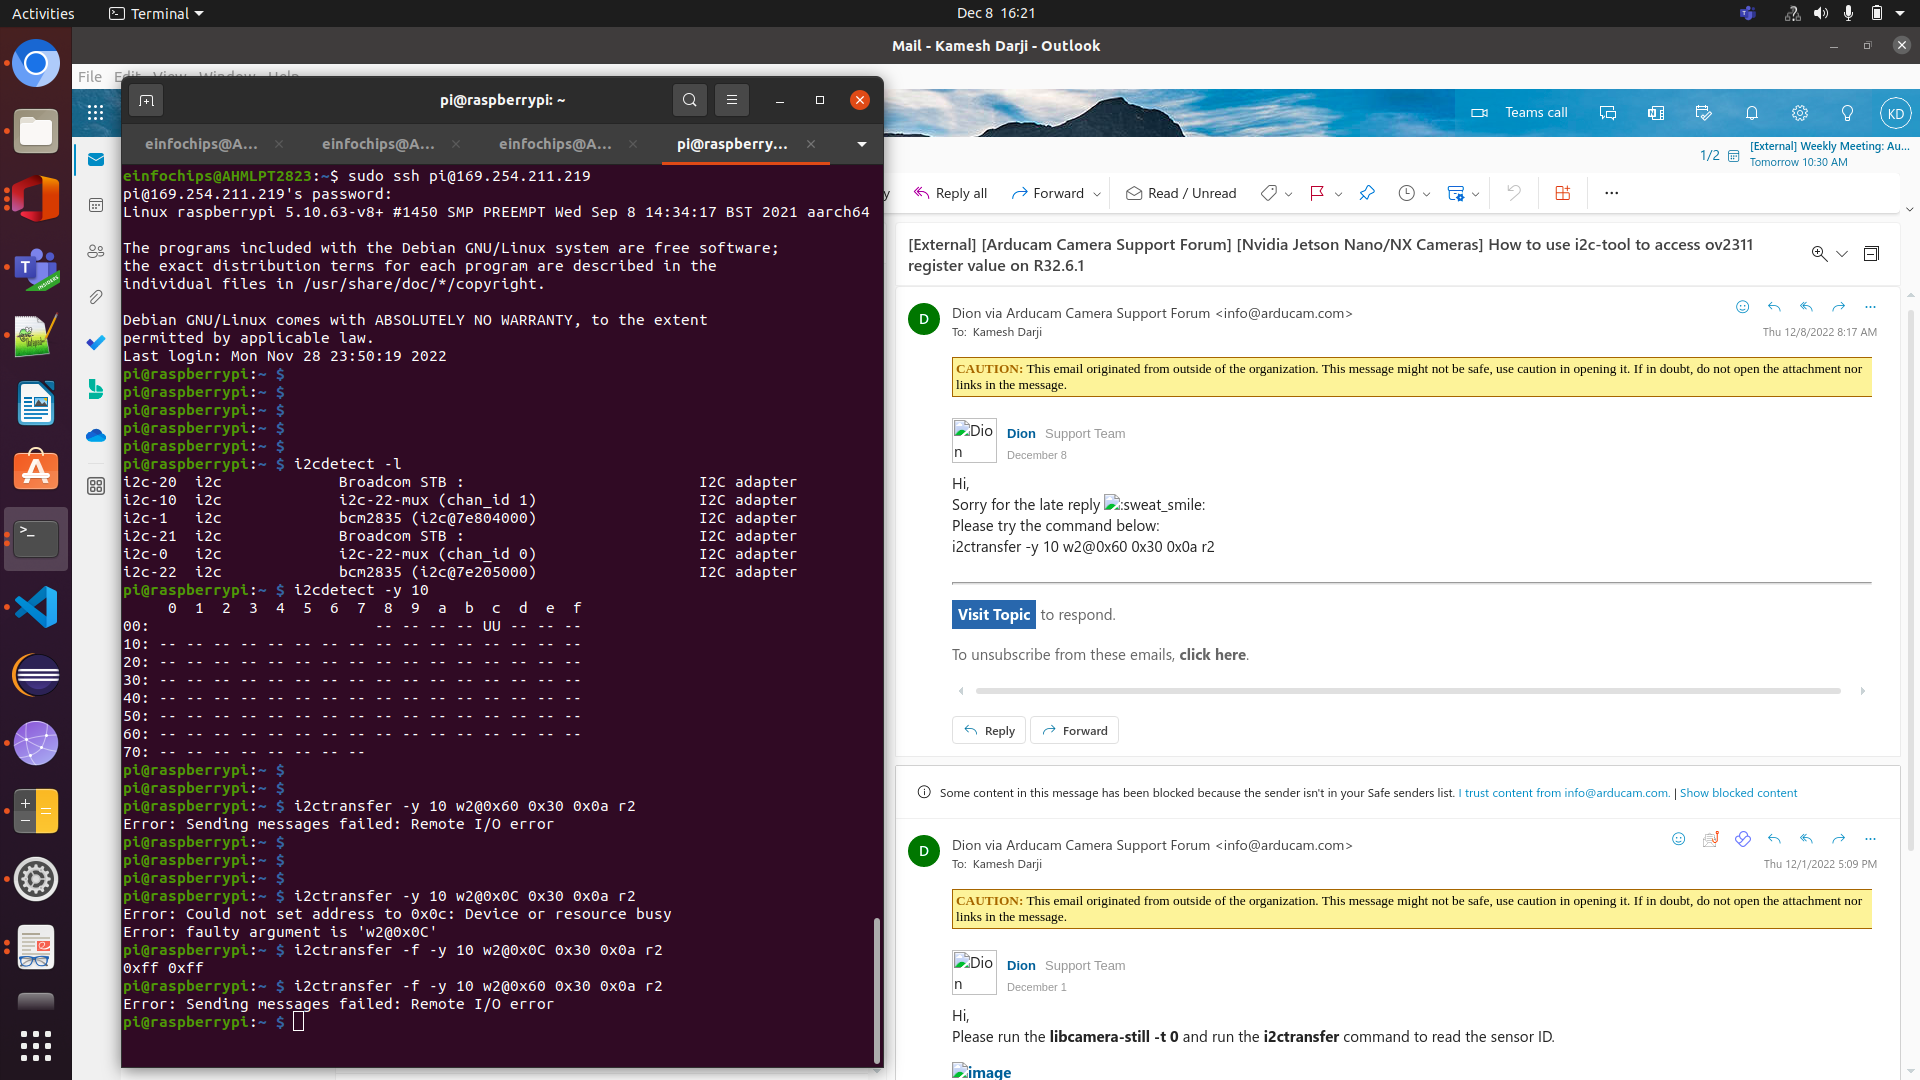
We got 0x0C slave id instead of 0x60.
Please help me to solve this issue.
Thanks,
Kems T.